Reverse engineering BeReal
Reverse engineering has always intrigued me, offering the opportunity to unlock the potential of apps with private APIs that companies prefer to keep hidden. In this article, I’ll share my journey of reverse engineering the popular social media app BeReal.
What is BeReal
BeReal is a social media app that has recently gained popularity. Where the whole idea is at a random time every day, all users in a region will get a notification when it is time to “Be Real.” When you receive the notification, you post a photo of whatever you are doing at the moment. The catch is that you can only see your friends’ posts after posting your BeReal for the day and will only see blurred images before. I wanted to reverse-engineer the app to see if viewing your friends’ posts from a web browser instead of the app is possible.
Network Requests
The first thing I like to do when reverse engineering a new application is inspect the network requests and see what you can find. The requests show what data an app requests from servers, which is crucial in reverse engineering. Finding network requests is easy for web applications as all modern browsers allow you to see network requests a site is making. Google provides a guide for how to inspect networking activity on Chrome.
Unfortunately, BeReal does not have a web client; the official clients are only available on iOS and Android, so inspecting network requests will be tricky. We will have to use a man-in-the-middle proxy. This type of proxy sits between your device and router and will listen to requests your clients make and responses the server gives back. Mitmproxy provides a comprehensive guide on how it works and installation instructions over at the mitmproxy docs
In early versions of the BeReal app, just a mitmproxy would be enough to start inspecting requests; however, newer versions of the app use SSL pinning to stop MITM attacks. SSL pinning is when the app hard-codes the SSL certificate of a server into the client application so even if mitmproxy’s certificate is trusted systemwide the app will still drop the requests. To disable SSL pinning on iOS you will need a jailbroken iPhone and Frida. I am using ssl-kill-switch3, a jailbreak tweak to disable SSL pinning system-wide.
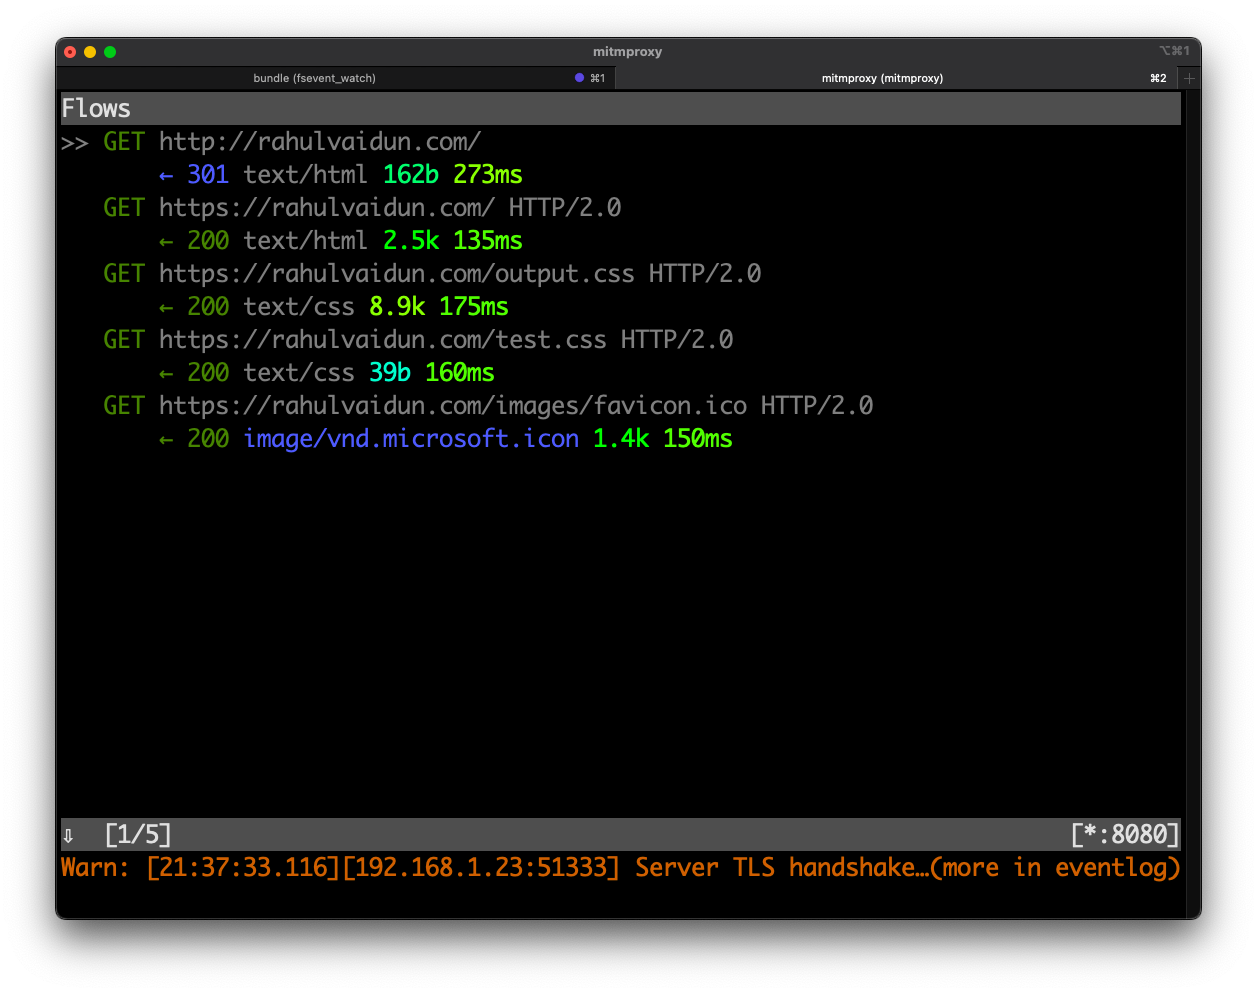
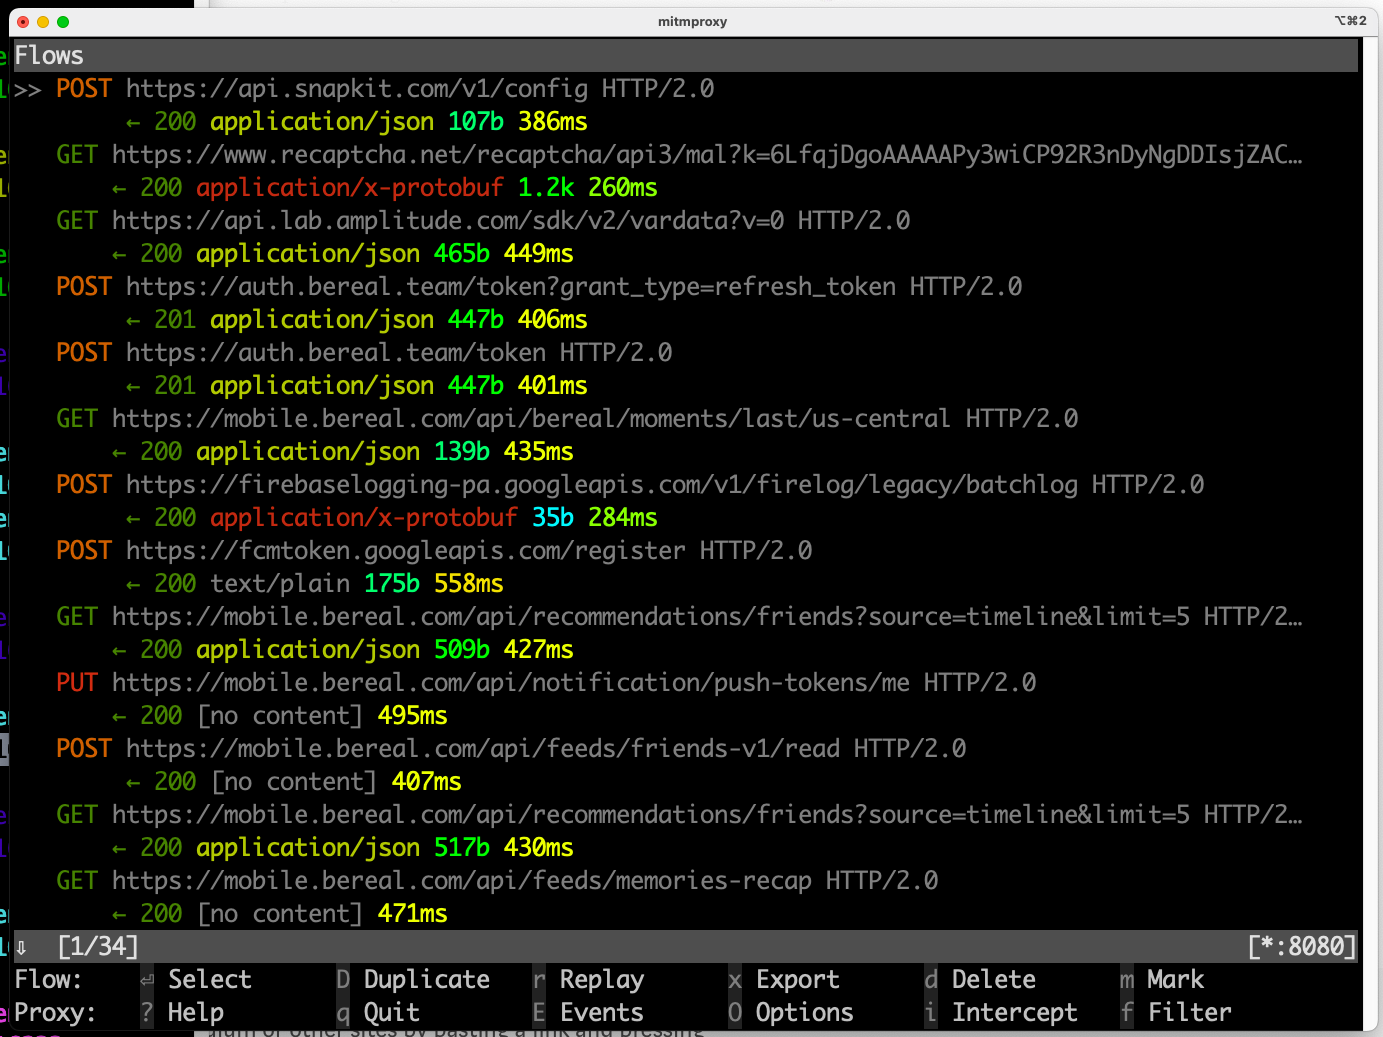
After the proxy is set up and SSL pinning disabled we can finally start inspecting network requests the BeReal app is making. I started up the BeReal app and found the following requests pop up on the proxy.
Login and Authentication
To start using the API we need to figure out how authentication works to authorize our requests to the BeReal endpoints. BeReal’s authentication only uses phone numbers with 2FA via SMS to log in users. Unfortunately in the latest version of the BeReal build BeReal is using non-standard SSL pinning techniques pre-login which I was unable to disable. I attempted to disable SSL pinning with SSL-kill-switch3 and Frida but both did not work and the client would not send the login requests to the server and hang with an infinite loading indicator. However, at the time of writing, SSLkillswitch still works to inspect network requests after the login flow to inspect other endpoints BeReal uses.
Using mitmproxy on older builds of BeReal and other Github repositories that reverse engineer BeReal I was able to piece together how BeReal authentication works and implemented authentication in my repository befake. The paragraphs in this section explain how BeFake is doing authentication as I am unable to get past the SSL pinning in the official app. If anyone reading this knows how to get past SSL pinning before login please contact me I would greatly appreciate it. The code for the login section can be found in pages/Login.vue on the befake repository.
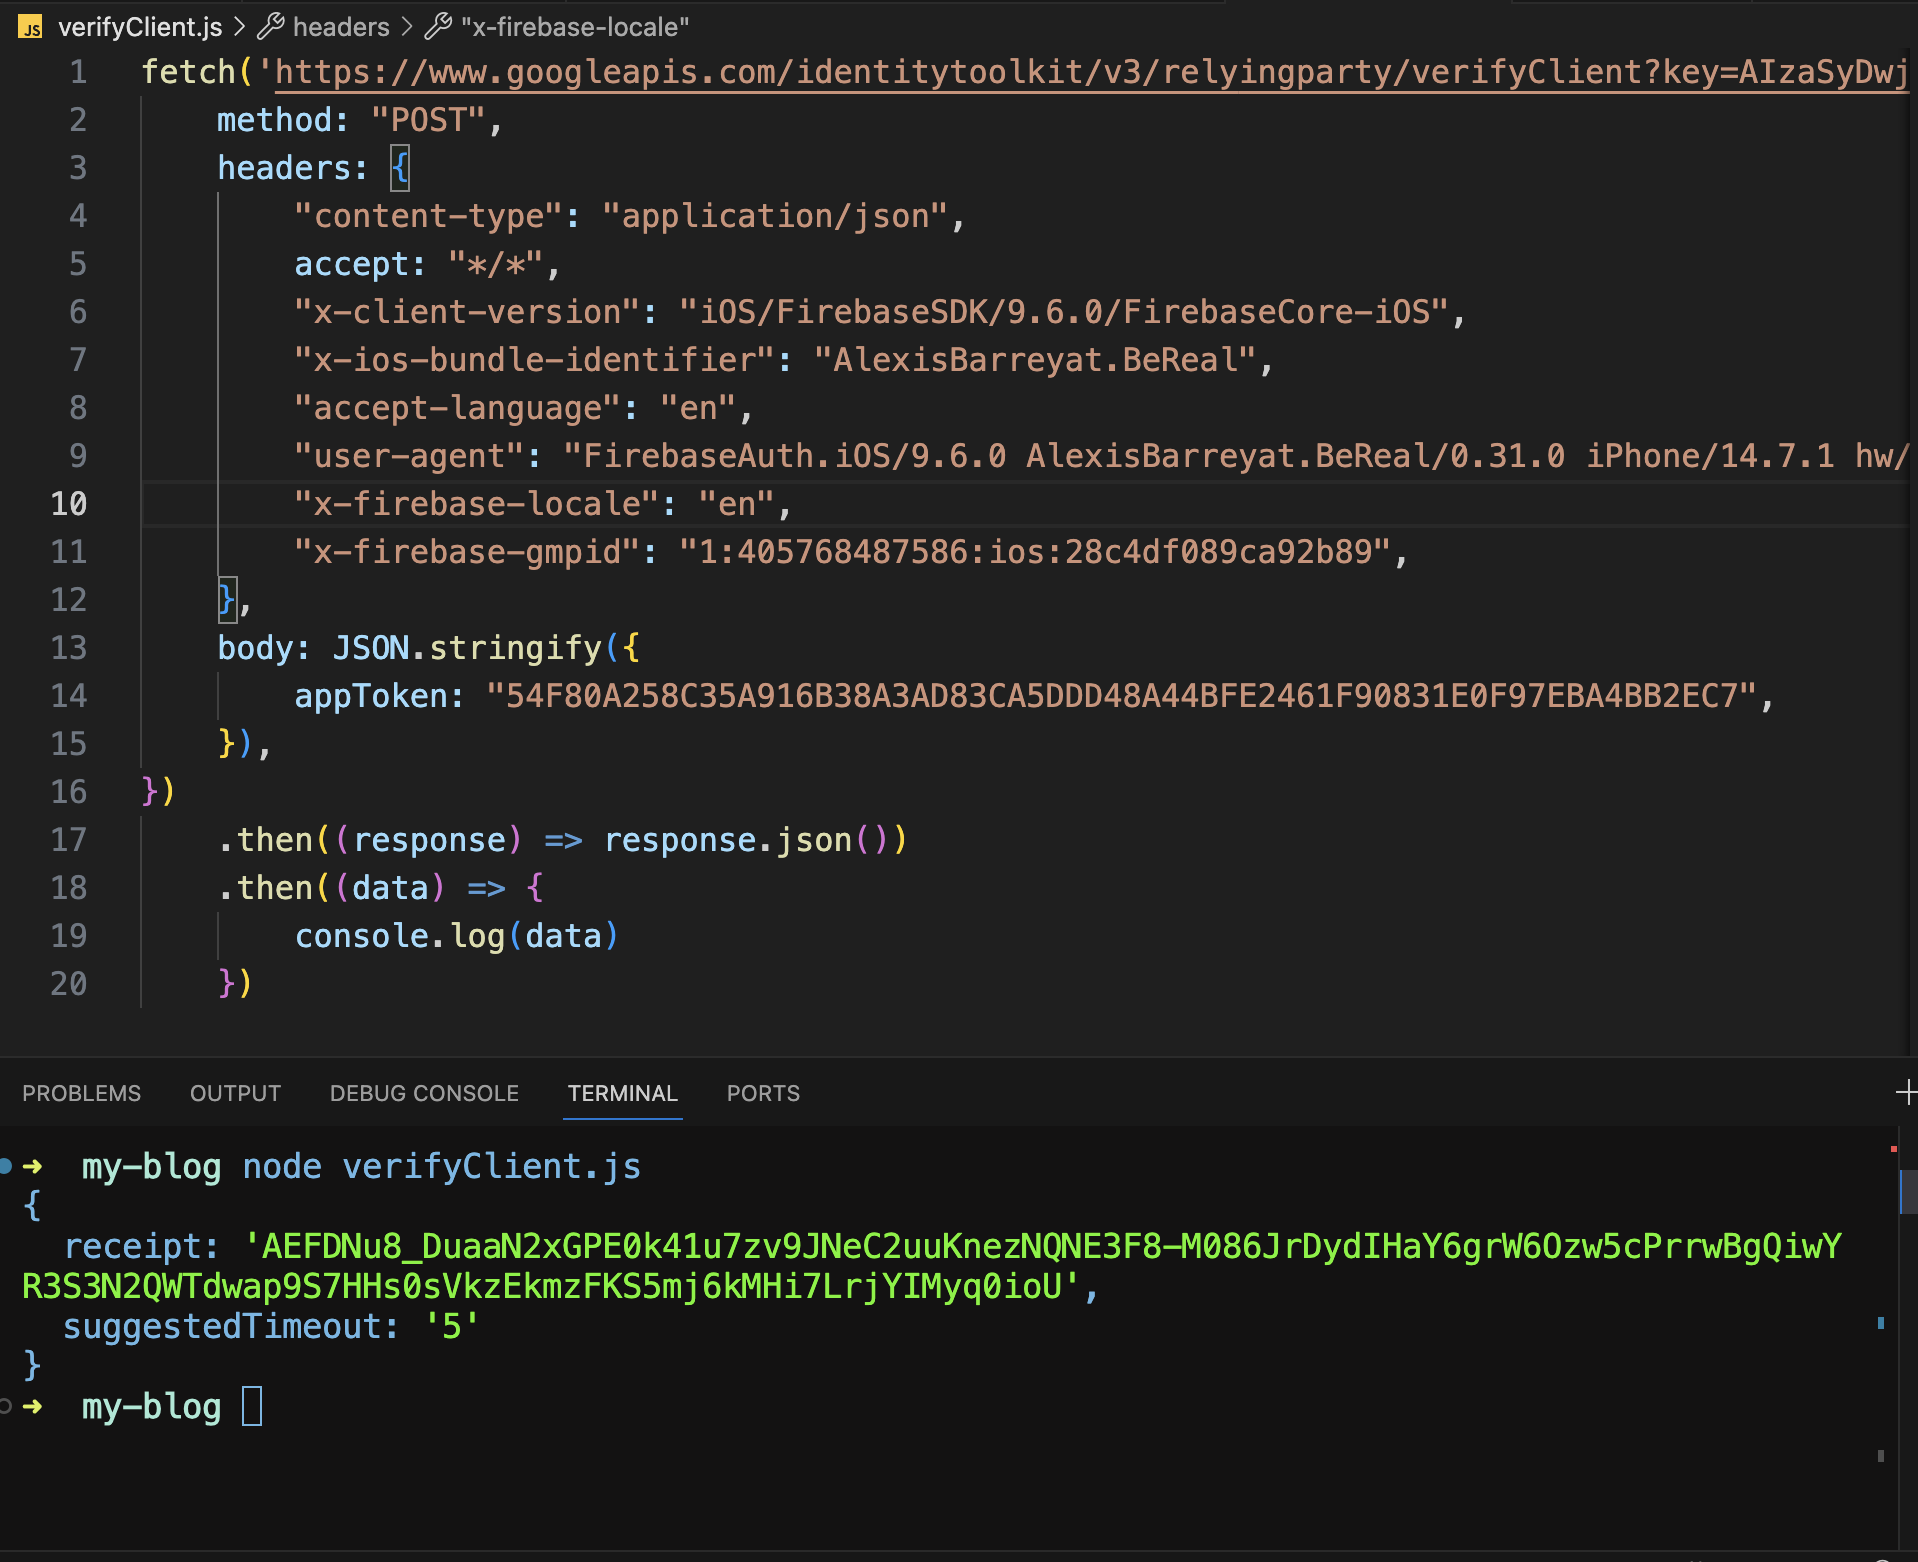
The first step in the login flow is the client initiates a request to a verifyClient endpoint. The client makes a POST request to https://www.googleapis.com/identitytoolkit/v3/relyingparty/verifyClient?key=AIzaSyDwjfEeparokD7sXPVQli9NsTuhT6fJ6iA with the following body.
{
    "appToken":"54F80A258C35A916B38A3AD83CA5DDD48A44BFE2461F90831E0F97EBA4BB2EC7"
}
appToken seems to be a static value as every time the client makes this request the same app token is sent. The server responds with a receipt.
The client uses this receipt as a unique token to send to the endpoint that sends the verification SMS. The client makes another POST request to https://www.googleapis.com/identitytoolkit/v3/relyingparty/sendVerificationCode?key=AIzaSyDwjfEeparokD7sXPVQli9NsTuhT6fJ6iA with a JSON body in the format of
{
    "iosReceipt": "Receipt from the verify client endpoint",
    "phoneNumber": "Your phone number with country code."
}
After sending this request the BeReal servers will send an SMS message with the verification code to the phone number provided. The sendVerificationCode endpoint responds to the client with a unique ID, sessionInfo. To verify the SMS token the client makes another post request to https://www.googleapis.com/identitytoolkit/v3/relyingparty/verifyCustomToken?key=AIzaSyDwjfEeparokD7sXPVQli9NsTuhT6fJ6iA with a JSON body in the format of
{
    "sessionInfo": "id from the sendVerificationCode endpoint",
    "code": "SMS code sent to the phone number",
    "operation": "SIGN_UP_OR_IN"
}
From my testing, the operation is always hardcoded to SIGN_UP_OR_IN. This endpoint sends back a refreshToken. The refreshToken is not enough to authenticate with the API we will need full JWT tokens (Read more on JWT tokens) The client makes yet another request with the refreshToken to get JWT tokens. The client makes a POST request to https://securetoken.googleapis.com/v1/token?key=AIzaSyDwjfEeparokD7sXPVQli9NsTuhT6fJ6iA with the following JSON body.
{
    "grant_type": "refresh_token",
    "refresh_token": "Refresh token received from the verifyCustomToken endpoint",
}
grant_type is hard coded to refresh_token. If all goes well this server will send back the following data refresh_token, id_token, and a user_id The server makes one final POST request to https://auth.bereal.team/token?grant_type=firebase with the following JSON body.
{
    "grant_type": "firebase",
    "client_id": "android",
    "client_secret": "F5A71DA-32C7-425C-A3E3-375B4DACA406",
    "token": "id token received from the previous request"
}
BeFake hardcodes the grant_type, client_id, and client_secret to the values shown above. The token is grabbed from the previous request to the /token Google API endpoint. I am unsure how the official client generates client_secret and client_id This server responds with an access_token, refresh_token and expires_in. The expires_in is just the number of seconds until this set of tokens expires. When the token does expire the previous two requests (https://securetoken.googleapis.com/v1/token?key=AIzaSyDwjfEeparokD7sXPVQli9NsTuhT6fJ6iA and https://auth.bereal.team/token?grant_type=firebase) need to be run again to get a new set of tokens. We can use access_token as the JWT token to authenticate with the BeReal API.
Endpoints
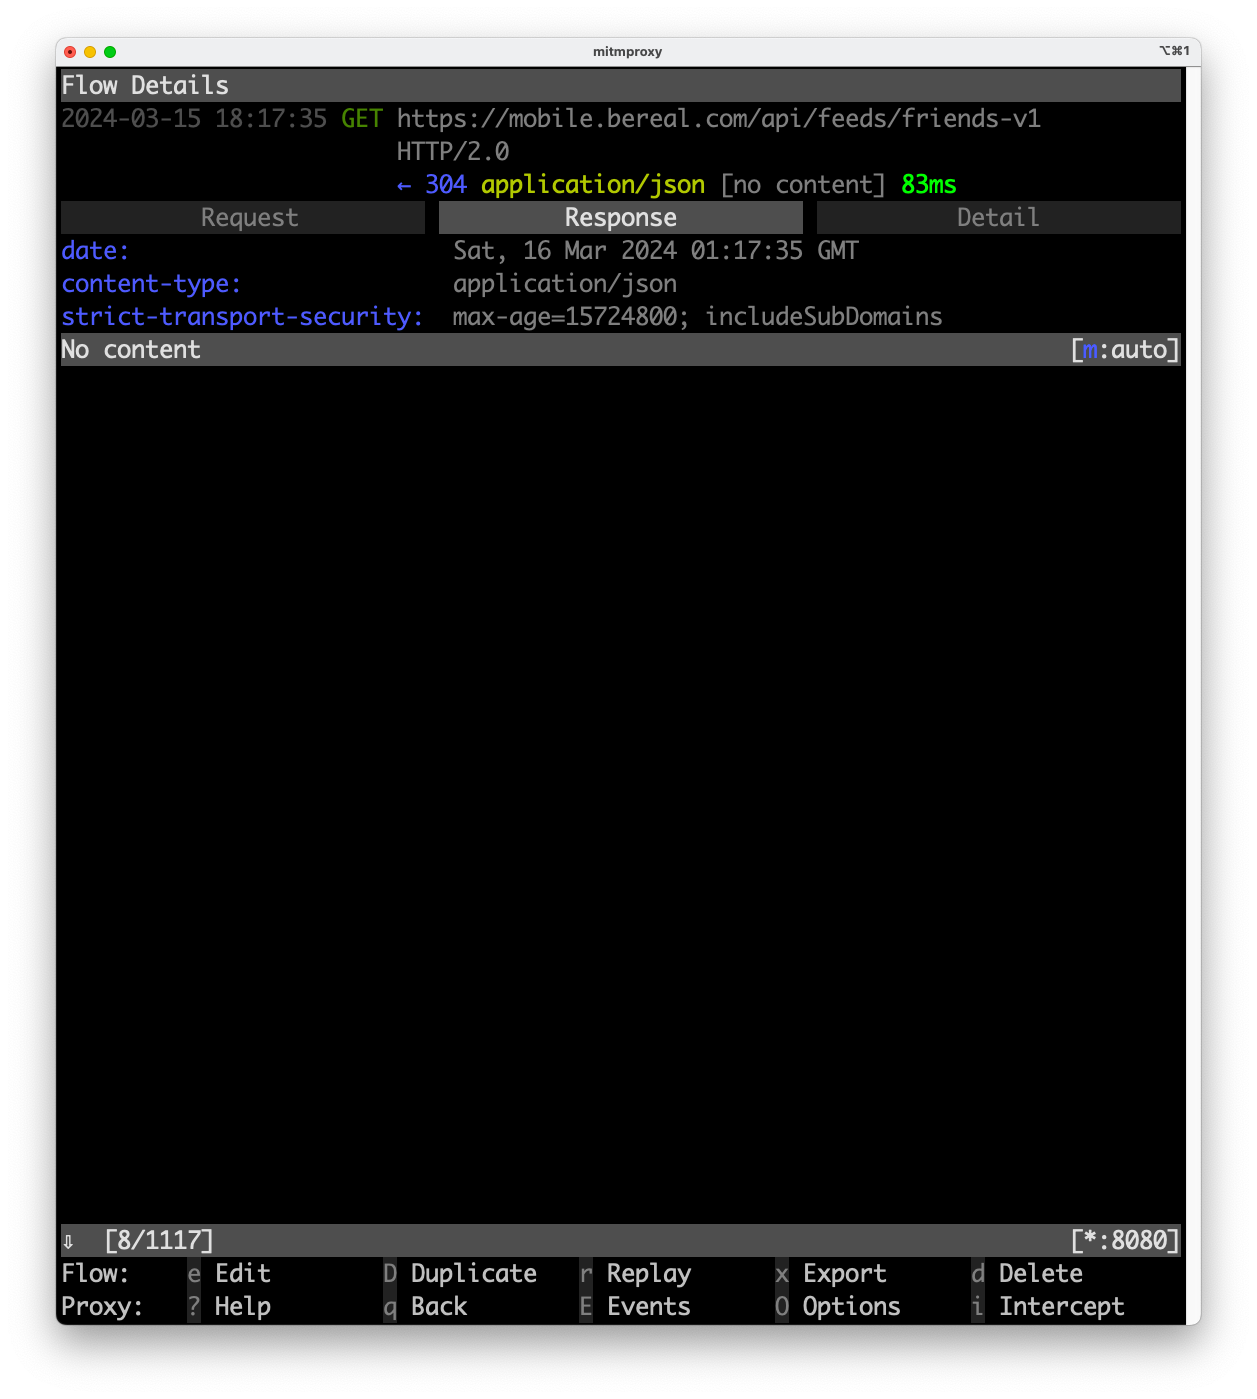
Now that we’ve got past the login flow, I can use mitmproxy and show the requests from the official client. After inspecting the requests the client is making I found one that looks like it has something to do with my friends’ posts, https://mobile.bereal.com/api/feeds/friends-v1.
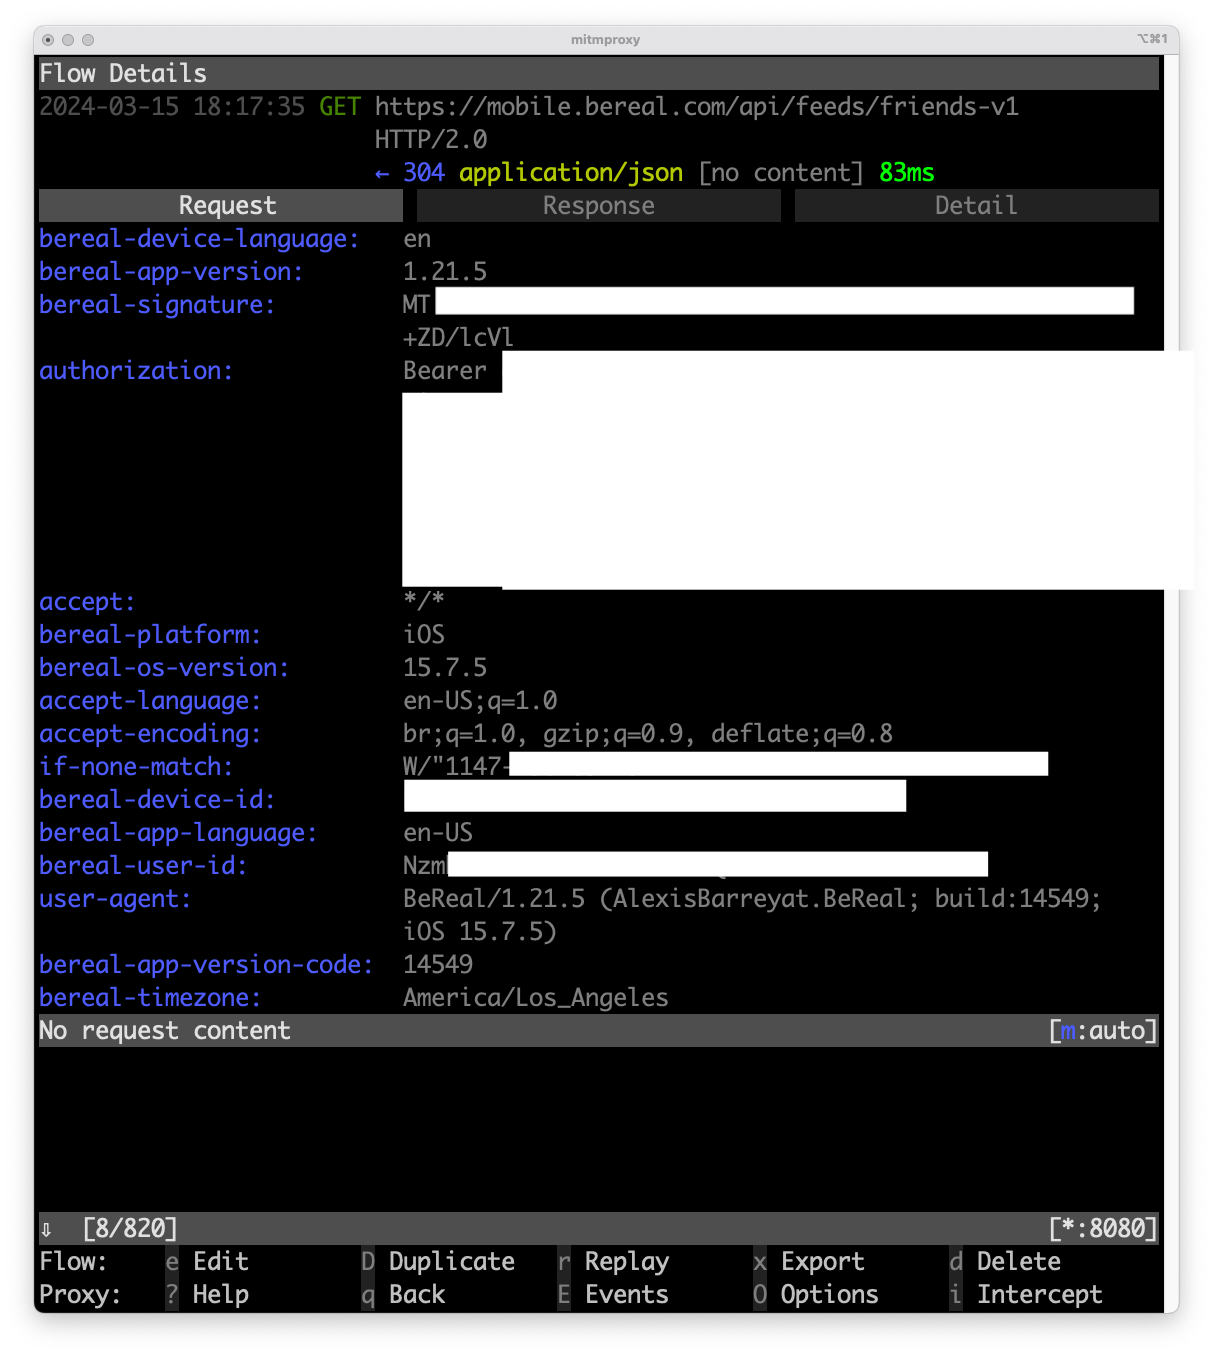
However, for some reason, the server is giving my client a 301 Moved Permanently error and there is no content in the response.
I need to inspect this further so I copy as cURL. In Mitmproxy you can copy the current network request with the :export.clip curl @focus command. cURL is not very useful and I’d like to make a Python script that just makes a call to this endpoint so I paste my clipboard into curlconverter to quickly get a Python script. (Note: I have changed the authorization, bereal-device-id, and bereal-user-id)
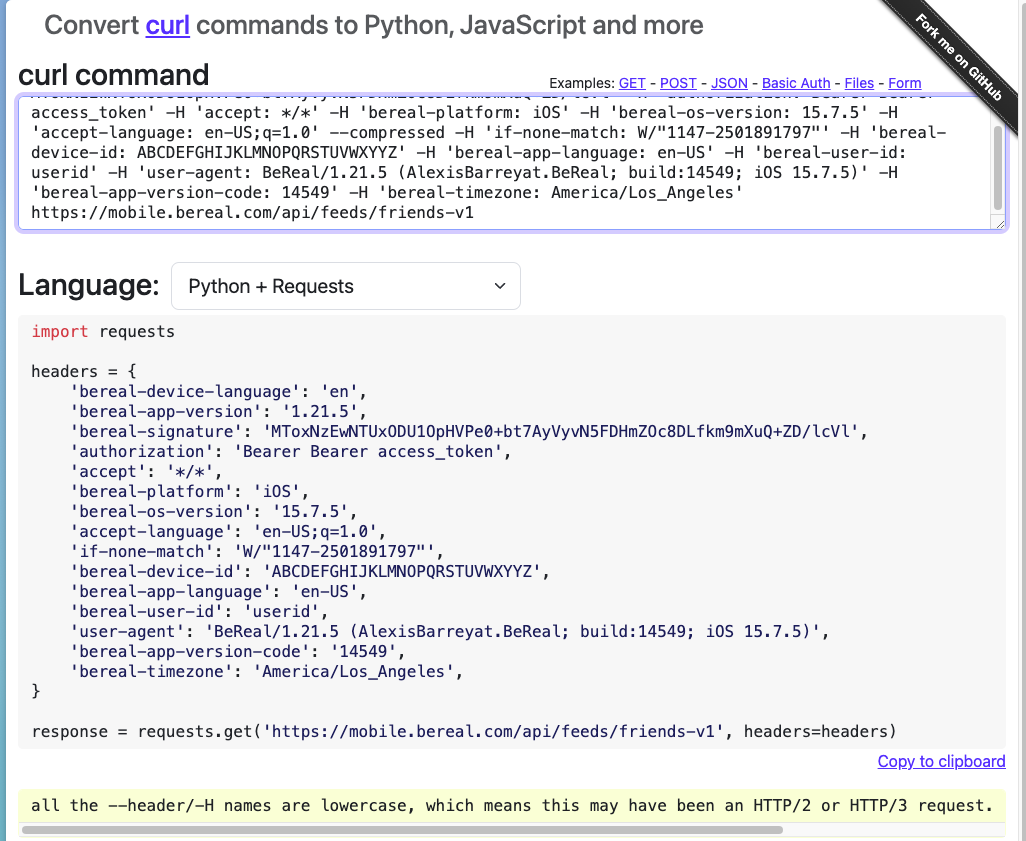
I modify the script a little bit so I’m able to see the response.
import requests

headers = {
    'bereal-device-language': 'en',
    'bereal-app-version': '1.21.5',
    'bereal-signature': 'MToxNzEwNTUxODU1OpHVPe0+bt7AyVyvN5FDHmZOc8DLfkm9mXuQ+ZD/lcVl',
    'authorization': 'Bearer access_token',
    'accept': '*/*',
    'bereal-platform': 'iOS',
    'bereal-os-version': '15.7.5',
    'accept-language': 'en-US;q=1.0',
    'if-none-match': 'W/"1147-2501891797"',
    'bereal-device-id': 'ABCDEFGHIJKLMNOPQRSTUVWXYYZ',
    'bereal-app-language': 'en-US',
    'bereal-user-id': 'USER_ID12',
    'user-agent': 'BeReal/1.21.5 (AlexisBarreyat.BeReal; build:14549; iOS 15.7.5)',
    'bereal-app-version-code': '14549',
    'bereal-timezone': 'America/Los_Angeles',
}

response = requests.get('https://mobile.bereal.com/api/feeds/friends-v1', headers=headers)
print(response.status_code)
print(response.text)
When testing, I see similar behavior as the official client and receive a 304. I started messing around with the headers and found if you don’t include the if-none-match header, the server will respond with 200 and sends back all of your friends’ posts for the day. I am assuming the if-none-match is a way for the client to tell the server it has already downloaded some photos so only send the response if there are more posts the client has not yet downloaded. I also noted the fields bereal-signature, authorization, bereal-device-id, and bereal-timezone are required, and failure to provide proper value in any of these fields results in a 401.
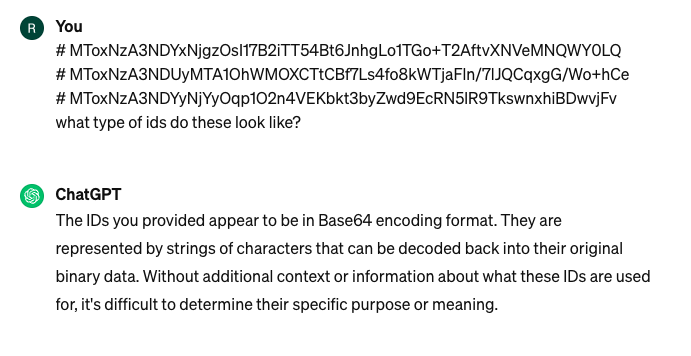
Let’s start with the most obvious field authorization, the same token we got from the login step. The client includes this header so the server can authenticate/identify which user is making the request. bereal-device-id seems to just be a UUID generated randomly that uniquely represents my device. It is unclear why bereal-timezone is being sent. The signature seems to be a set of random letters. I had no idea what bereal-signature could have been so I used a little Chat GPT magic and figured out it was a Base 64 encoded string. I decoded the string and found the following.
➜  ~ echo MToxNzEwNTUxODU1OpHVPe0+bt7AyVyvN5FDHmZOc8DLfkm9mXuQ+ZD/lcVl | base64 --decode
1:1710551855:��=�>n���\�7�CfNs��~I��{�����e%
➜  ~
It looks like the signatures are in the format of 1:{random_numbers}:{random_bits}. I tested out a couple more signatures and found the same pattern after decoding. Each time the client makes a request using the API a unique bereal-signature is generated so I could get as many signatures as I needed. I was also pretty quickly able to realize the random_numbers was the current time as a UNIX timestamp. I needed to further decode the random_bits so I used hexdump.
➜  ~ echo MToxNzEwNTUxODU1OpHVPe0+bt7AyVyvN5FDHmZOc8DLfkm9mXuQ+ZD/lcVl | base64 --decode | hexdump -C
00000000  31 3a 31 37 31 30 35 35  31 38 35 35 3a 91 d5 3d  |1:1710551855:..=|
00000010  ed 3e 6e de c0 c9 5c af  37 91 43 1e 66 4e 73 c0  |.>n...\.7.C.fNs.|
00000020  cb 7e 49 bd 99 7b 90 f9  90 ff 95 c5 65           |.~I..{......e|
0000002d
➜  ~
In the hexdump, I noticed the amount of bits in the random_bits was 256 bits which led me to suspect some type of SHA256 hash (Read more on hashing algorithms). Given the required headers I guessed the hash was most likely some combination of the current UNIX timestamp, bereal-device-id, bereal-timezone and some secret key to make the hashes difficult to brute force. The pseudocode to generate a hash would be:
def generate_hash(timezone, device_id , current_time, secret_key):
    message = timezone + device_id + current_time
    return SHA256HMAC(message, secret_key)
Network requests would not be enough to inspect the functions in the app.
Frida
After a little bit of searching, I came across a tool called Frida that would help me inspect low-level functions. Frida is also available to download as a package on jailbroken iOS devices for powerful dynamic analysis on iOS apps. This was my first time using Frida so I had no idea where to start. After reading the docs for a few hours I came across the example usages for frida-trace and one usage particularly caught my eye.
# Launch SnapChat on your iPhone and trace crypto API calls
$ frida-trace \
    -U \
    -f com.toyopagroup.picaboo \
    -I "libcommonCrypto*"
I wanted to trace the crypto API calls for the BeReal app. To find the package name for BeReal I used the following command
➜  ~ frida-ps -Ua
 PID  Name              Identifier
----  ----------------  ---------------------------------------
 308
       AltStore      com.5WVHLY9ZK7.com.rileytestut.AltStore
 596
       AppStore      com.apple.AppStore
9351
       BeReal        AlexisBarreyat.BeReal
 282
       Maps          com.apple.Maps
 396
       MobileSMS     com.apple.MobileSMS
 305
       MobileSafari  com.apple.mobilesafari
 242
       Search        com.apple.Spotlight
8995
       Settings      com.apple.Preferences
 597
       Snapchat      com.toyopagroup.picaboo
 306
       TikTok        com.zhiliaoapp.musically
 309
       TrollStore    com.opa334.TrollStore
 307
       Twitter       com.atebits.Tweetie2
➜  ~
I ran the same trace command with the BeReal app and saw the following happen.
Let’s understand what’s happening here. First frida-trace auto generates a bunch of handlers for all the functions in the libcommonCrypto library in the __handlers__ directory. Opening the directory shows the following
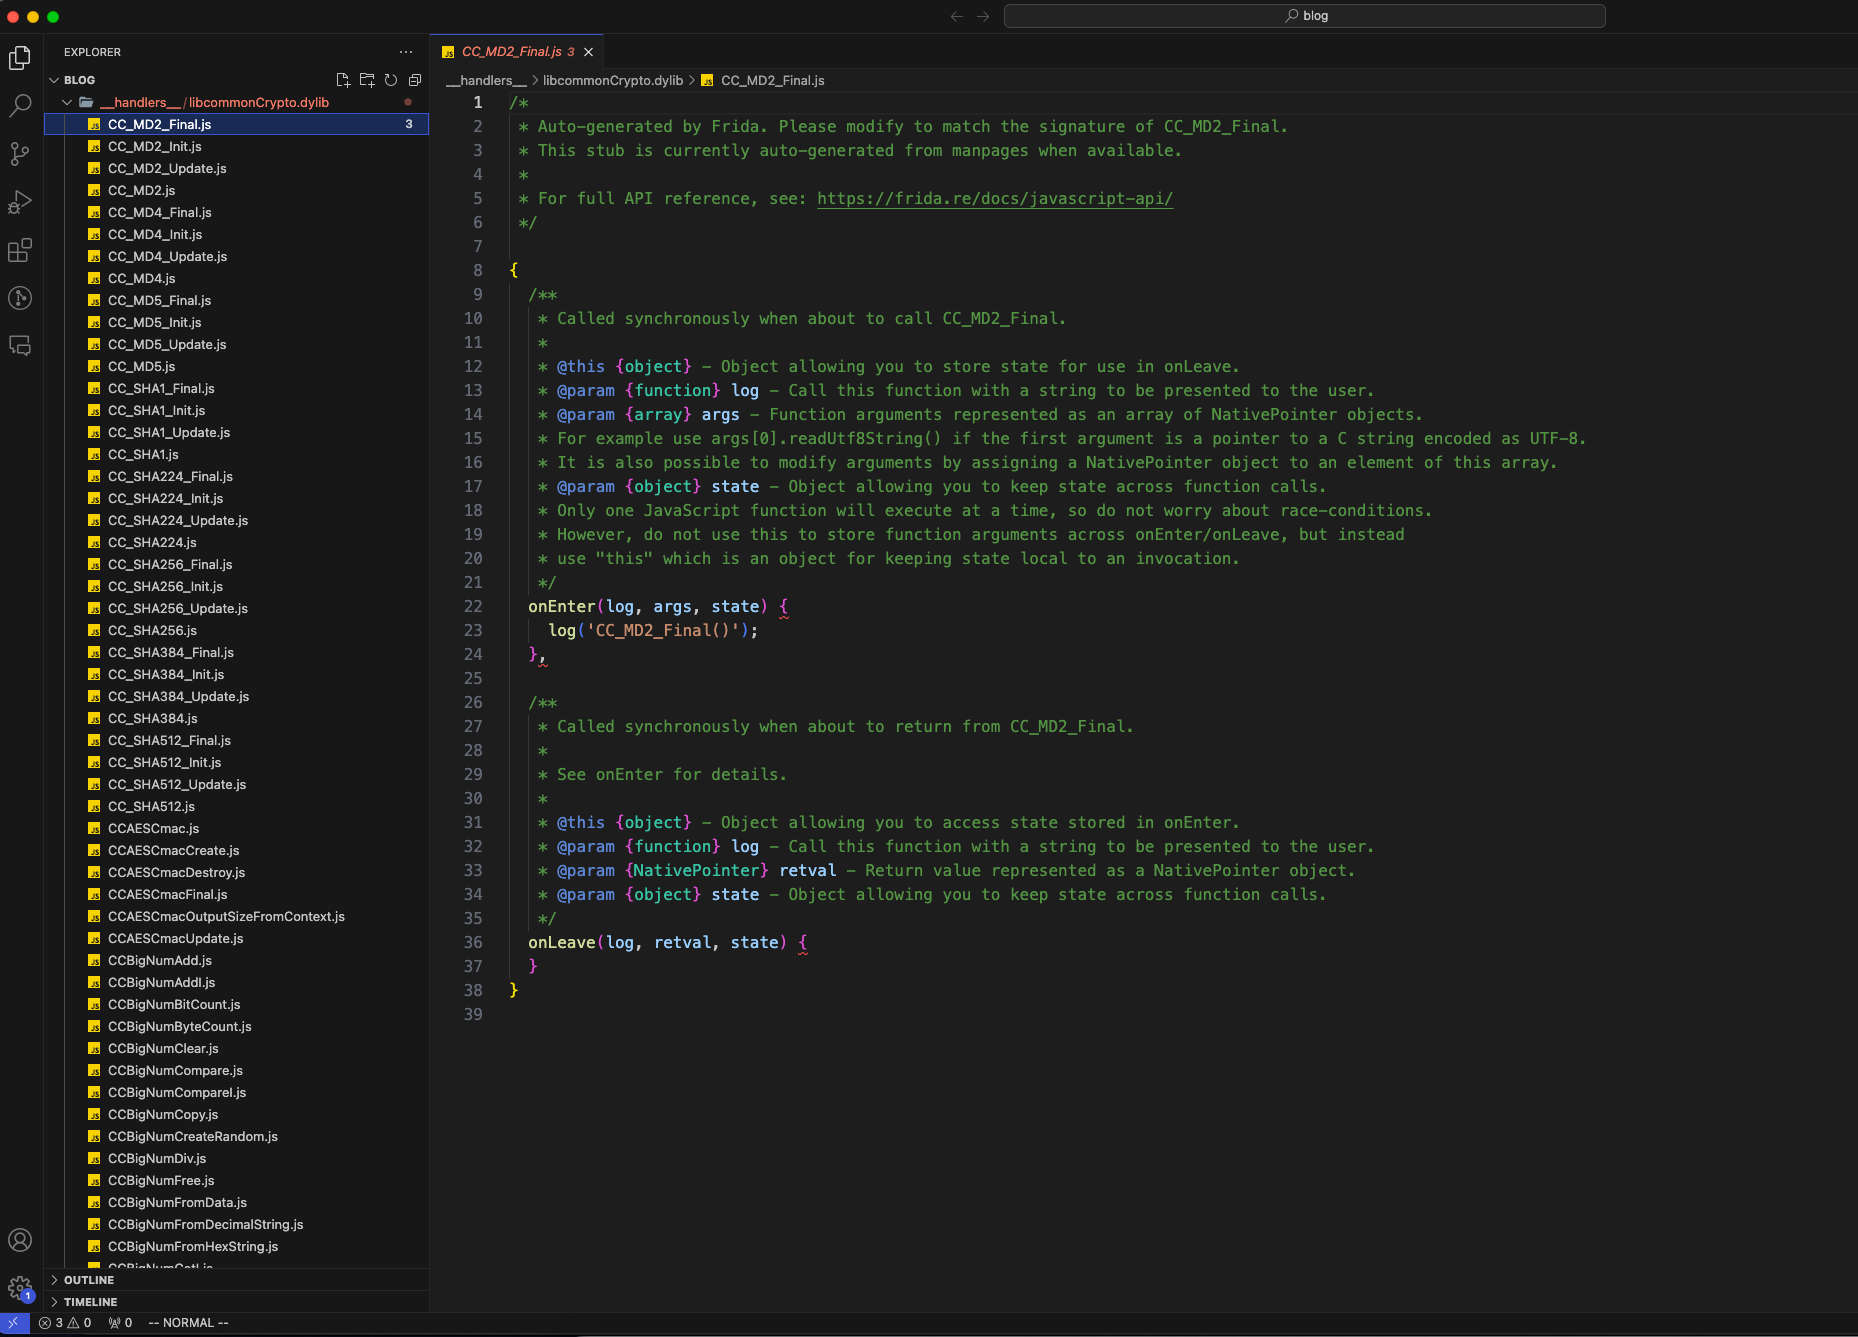 With these hooks, we can know when the functions get called and other important information such as the state of the app and the parameters passed into the function. Frida-trace only generates the handlers if the handlers directory is not found in the working directory. On subsequent runs, we can instantly see the calls being made. In the video it took too long for Frida to generate all the handlers and the app crashed so I ran the command again and was finally able to see all calls made in the crypto library. There are 1000s of calls to the crypto library happening but after analyzing the function calls for a few hours I find 3 calls that look particularly interesting.
1700 ms  CCHmacInit(ctx=0x16deb2ae0, algorithm=0x2, key=0x2816b1fa0, keyLength=0x20)
1700 ms  CCHmacUpdate(ctx=0x16deb2ae0, data=0x282d6efa0, dataLength=0x58)
1700 ms  CCHmacFinal(ctx=0x16deb2ae0, macOut=0x2816b2b60)
These calls always happen in the same order and occur multiple times throughout the application startup. These calls also happen whenever the client makes a request to the friends-v1 endpoint and happen to be the only ones with arguments passed to the functions. I need to find out more about the functions and after a Google search, I find the header file for the CCHmac functions. The variable ctx seems to just be a memory pointer that represents an HMAC context or object that is being worked on. Notice how all 3 functions have the same ctx value. For those of you familiar with C programming this is similar to when you create ADT (read more on ADT) and have functions specific to the ADT. The algorithm parameter is just an enum used to represent what algorithm is being used to hash. A value of 2 indicates an HMAC with a SHA256 digest. The key argument is the memory location of the secret key being used to hash and obviously, keyLength is just the length of the key. The data parameter is a pointer to the data that should be hashed and dataLength is the length of the data. The length is being passed so the function how many bytes to read from the pointers. macOut is a pointer to where the 256-bit hash should be stored. Just knowing the memory locations is not very helpful to us as we need to be able to see the actual values at those memory addresses. Frida allows us to do this by modifying the handlers. I update the onEnter functions CCHmacInit.js and CCHmacUpdate.js files in the __handlers__ folder to the following
// __handlers__/libcommonCrypto.dylib/CCHmacInit.js
onEnter(log, args, state) {
    log(`CCHmacInit(ctx=${args[0]}, algorithm=${args[1]}, key=${args[2]}, keyLength=${args[3]})`);
    const dataArrayBuffer = Memory.readByteArray(args[2], args[3].toInt32());
    const uint8Array = new Uint8Array(dataArrayBuffer);
    let utf8String = '';
    for (let i = 0; i < uint8Array.length; i++) {
      utf8String += String.fromCharCode(uint8Array[i]);
    }
    log(`data: ${utf8String}`);
}

// __handlers__/libcommonCrypto.dylib/CCHmacUpdate.js
onEnter(log, args, state) {
    log(`CCHmacUpdate(ctx=${args[0]}, data=${args[1]}, dataLength=${args[2]})`);
    const keyArrayBuffer = Memory.readByteArray(args[1], args[2].toInt32());
    const uint8Array = new Uint8Array(keyArrayBuffer);
    let utf8String = '';
    for (let i = 0; i < uint8Array.length; i++) {
        utf8String += String.fromCharCode(uint8Array[i]);
    }
    log(`key: ${utf8String}`);
}
After modifying the frida-trace command to only trace the CCHmac calls in the BeReal app with frida-trace -U -f AlexisBarreyat.BeReal -i "CCHmac*" I see the following.
4139 ms  CCHmacInit(ctx=0x16e51eae0, algorithm=0x2, key=0x2834051a0, keyLength=0x20)
4139 ms  key: $ecretKey123456
4139 ms  CCHmacUpdate(ctx=0x16e51eae0, data=0x280fcd420, dataLength=0x58)
4139 ms  data: QUJDREVGR0hJSktMTU5PUFFSU1RVVldYWVlaQW1lcmljYS9Mb3NfQW5nZWxlczE3MTA2MzE1NDk=
4139 ms  CCHmacFinal(ctx=0x16e51eae0, macOut=0x283407960)
I have changed the output to protect my device ID and BeReal’s secret key. I recognize the data to be a Base64 encoded string and after decoding I see the following
➜  ~ echo QUJDREVGR0hJSktMTU5PUFFSU1RVVldYWVlaQW1lcmljYS9Mb3NfQW5nZWxlczE3MTA2MzE1NDk= | base64 --decode
ABCDEFGHIJKLMNOPQRSTUVWXYYZAmerica/Los_Angeles1710631549%
➜  ~
The base64encoding is just the device_id, timezone, and current unix timestamp concatenated. It also makes sense why the bereal-timestamp header needs to be sent now, so the server can verify the signature is correct. There is probably some logic in the BeReal servers that generates a hash with the UNIX timestamp provided in the signature, device_id, and timezone and verifies that the client has provided the same hash. We finally know both the message and key being used for the SHA256 HMAC!
For example, let’s say a client passes these headers
{
    "bereal-signature": "MToxNzA3NDgwMjI4OhBj2ijVK5qyabYJuKF4QThGuIJmIzabd/dIYQYtzLZQ",
    "bereal-timezone": "Europe/Paris",
    "bereal-device-id": "937v3jb942b0h6u9"
}
After decoding the signature with hexdump we get
➜  ~ echo MToxNzA3NDgwMjI4OhBj2ijVK5qyabYJuKF4QThGuIJmIzabd/dIYQYtzLZQ | base64 --decode | hexdump -C
00000000  31 3a 31 37 30 37 34 38  30 32 32 38 3a 10 63 da  |1:1707480228:.c.|
00000010  28 d5 2b 9a b2 69 b6 09  b8 a1 78 41 38 46 b8 82  |(.+..i....xA8F..|
00000020  66 23 36 9b 77 f7 48 61  06 2d cc b6 50           |f#6.w.Ha.-..P|
0000002d
➜  ~
We are trying to find a SHA256 hash that starts with 1063da. Since we know both the message and secret key we can generate a SHA 256 HMAC with the following command
# First find the base64 encoding and then get the HMAC
➜  ~ echo -n "937v3jb942b0h6u9Europe/Paris1707480228" | base64
OTM3djNqYjk0MmIwaDZ1OUV1cm9wZS9QYXJpczE3MDc0ODAyMjg=
➜  ~ echo -n "OTM3djNqYjk0MmIwaDZ1OUV1cm9wZS9QYXJpczE3MDc0ODAyMjg=" | openssl dgst -sha256 -hmac "\$ecretKey123456"
SHA2-256(stdin)= 1063da28d52b9ab269b609b8a178413846b8826623369b77f74861062dccb650
➜  ~
Notice how the hash is identical to the hash in the signature. With all this information I wrote a simple Python script that allows me to generate signatures quickly.
import base64
import hashlib
import hmac
key = "$ecretKey123456"
device_id = "ABCDEFGHIJKLMNOPQRSTUVWXYZ"
timezone = "America/Los_Angeles"
unixts = "1707480228"

data = device_id + timezone + unixts
data_bytes = data.encode("utf-8")

base64_bytes = base64.b64encode(data_bytes)
base64_string = base64_bytes.decode("utf-8")

signature = hmac.new(
    bytes(key, 'utf-8'),
    msg=bytes(base64_string, 'utf-8'),
    digestmod=hashlib.sha256
)


s2 = b"1:" + unixts.encode("utf-8") + b":" + signature.digest()

s3 = base64.b64encode(s2)
print("bereal-timezone:", timezone)
print("bereal-device-id:", device_id)
print("bereal-signature:", s3.decode("utf-8"))
We can use the values provided by this script as headers to the friends-v1 endpoint without receiving 401s. This allows us to generate fake devices for BeReal’s API. We can also generate new unique signatures on the fly without having to rely on the client to get a new signature.
What’s Next
I don’t plan on developing this project further as I was able to complete my goal of bringing BeReal to the web and learning more about reverse engineering.